|


FAQ
GLOSSARY
HELP


| |
|
Making Boba - The Ultimate
ESB Helmet
A Tutorial by Steve the Swede |
| This project
started out over a year ago when I managed to get hold of a raw MSH (Movie
Size Helmet), originally produced by Natty. Now I'm no prop maker and
certainly don't have the skill to attack something like this so I
therefore turned to a good friend, Steve the Swede and convinced him
take the project on. BTW when I say "convinced", I really
mean "moaned on and on and on and on and on" until in the end he
said "all right, all right, goddamn it - I'll do the Bloody thing
if you just SHUT UP and go away!!!"
So I left him alone and this is what he did (in
Steve's own words)..............
When starting the project we agreed that the goal of this project
should be to make the most accurate ESB helmet that was possible. After
going thru a ton of reference material I quickly learnt that this was
going to be a VERY time consuming project!
Starting up. The first thing I did was to decide that I was going to
handle all the topical weathering. This was how I did my ROTJ helmet a
couple of years back and I quickly fell in love with the technique. The
next step was to try and track down all the paints listed by Lee, this was
pretty hard here in Sweden which (like the UK) is basically "Humbrol
country". Therefore I had to source the paints from the U.S. and
after receiving them I went to work! |
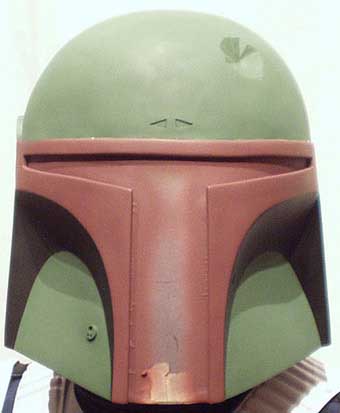
| Pic 1: The entire helmet had been cleaned up by
the owner so I could start painting right away. The helmet was primed
white and then the colors were airbrushed on. I stuck with acrylics and
these are the colors I used: Dome and cheeks: "Model masters Panzer
olive Grun". Mandibles: "Polly scale Box car red" mixed
with some bright red (I didn't like the the tone of the Box car straight
from the bottle). Upper cheeks: "Polly scale Brunswick green". |
 |
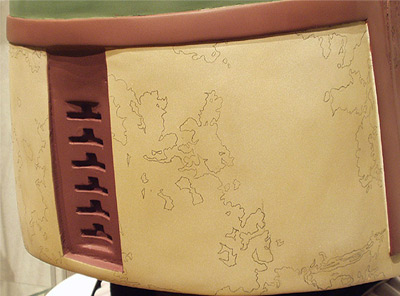 |
Pic 2: I painted the back with a mix of Humbrol Egg
blue mixed with Khaki. I then traced the light colored scratches with a
pencil. This was the only part that I didn't want to go topical. I was afraid
that the light color would bleed if they were a applied topical over dark
green. When the scratches had been traced I masked them with "Windsor
& Newton's masking fluid" which is a dream to work with. |
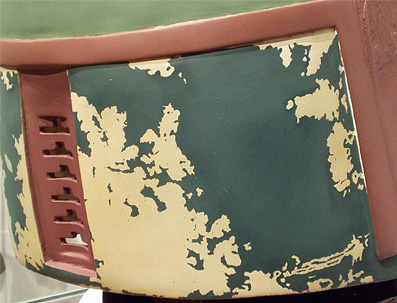 |
Pic 3: The green was then airbrushed on, the colors used was
"Polly scale Euro green" mixed "Polly scale Bar blue"
and "Polly scale Brunswick green". The masking latex was then
removed. |
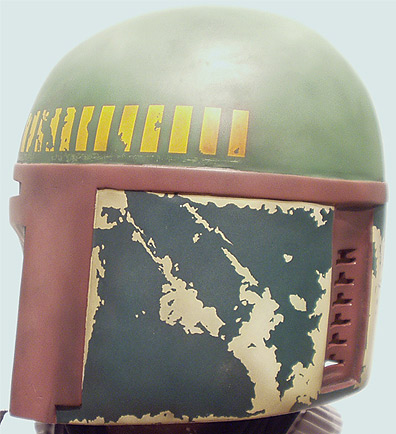
| Pic 4: The kill stripes been added. They were masked with air
brush film and liquid latex. The color used was "Polly scale UP Armor
yellow". Then the entire helmet was dusted with black pastel powder
to make the colors "deeper". Some prefer washes but I've always
loved to work with pastel. The kill stripes was also dusted with red
pastel powder and they will receive a second dusting later on. |
 |
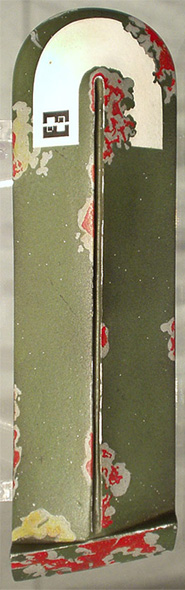 |
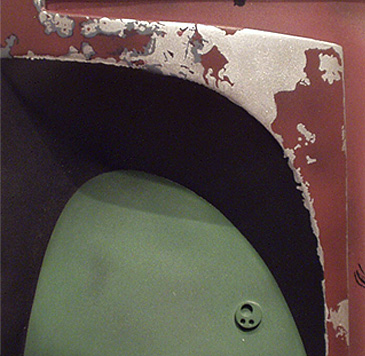
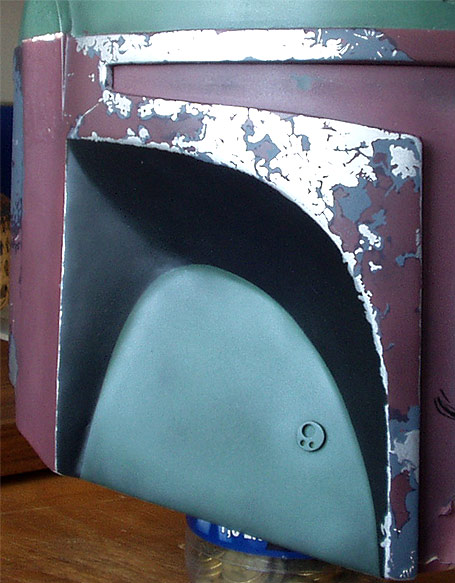
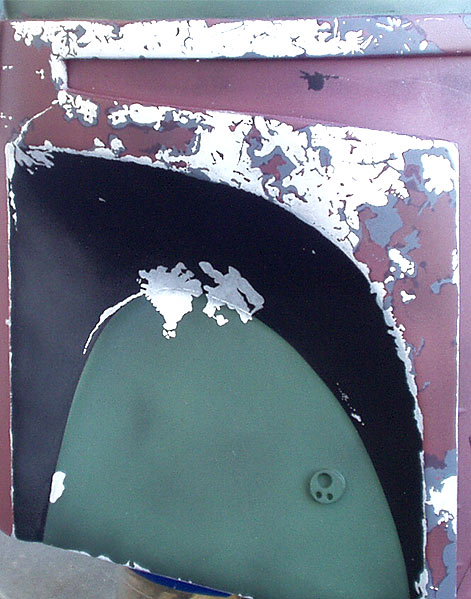
Pic 5: I decided that before I went on with the helmet I
would complete the "green ear". The reason I wanted to do this
was because the ear incorporates all the different weathering techniques
used on the helmet, in other words it would be the perfect training before
attacking the helmet.
I painted the ear white a custom mix of "Humbrol" paints. Then I
masked the "arch" and sprayed it white and applied the decal. I
traced all the scratches with a pencil and painted them on topical with 0
sized brush. The ear was "smudged" with different colored pastel
powders and then the entire ear was misted with black and grey spray. When
everything was dry I locked it with "Citadels satin Varnish". |
Pic 6: Weathering begins!
I decided to start with the back just because it appeared to be the most
"chaotic" part of the entire helmet! Better to start with that
when energy was high and not save it to the last. |
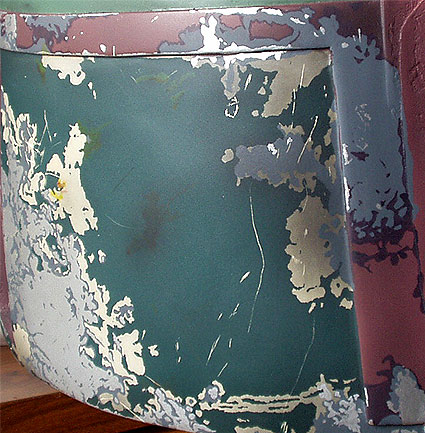 |
I really recommend that you weather the helmet in
sections rather then going wild all over, it's so much easier to keep
track this way.
I started with tracing every single scratch. Then I painted all the silver
ones (using a 0 sized brush) with Humbrol's Silver metal coat. It's
a fast drying enamel paint which is perfect for this! Then I did all the
grey scratches with "Polly scale Lark grey" straight from the
bottle. |
Finally came the purple scratches, they were
done with a mix of "Polly scale AT SF Red" "Polly scale Bar
blue" and a couple of drops of "Polly scale Brunswick
green".
The small scratches was made with a needle revealing the white primer.
Finally I did the small "yellow glue blobs!?" with "citadel
inks" applied with a make up sponge.
|
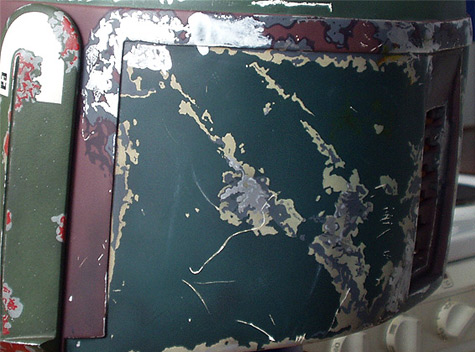
Pic 7: Another view of the finished back. The
"thumb" print was done with white acrylic thinned with water. It
was painted on in layers and then sanded down until it looked right.
|
 |
 |
Pic 8: As you can see in this pic I didn't set
out to make the silver super bright and clean. I always thought it looked
scratched and dull on the real helmet so that's the look I tried to achieve.
The Kill stripe have also been given a second dusting with red pastel.
|
Pic 9:(below) Moving on to the Mandibles. |
|
|
|
Just like before everything was traced first. Then silver
was applied.
|
 |
Pic 10:Then the Lark grey was painted on and
finally the purple mix.
|
|
|
|

|
Pic 11: (above) Close up. When all
the scratches were done I continued with the details such as "paint
streaks" and the "crack repair". The crack was done with a
screw driver, the groove was then filled with different colored
"Citadels inks". The "putty streaks" was made with a
"Humbrol grey/tan" mix and applied with a broad brush.
|
|
|
|
Pic 12: The finished mandibles! All that's missing now
is the tan paint splatter that goes all over them. Now to move onto the
Cheeks!. |
|
|
| Pic 13: Moving on to the cheeks. Nothing new here, trace,
then paint. |
 |
 |
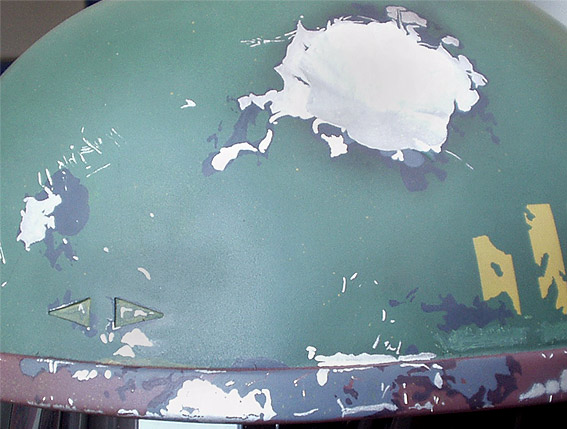
Pic 14: The cheeks have been finished! I discovered that the
"lark grey" was far to close to the "Panzer green" in
it's tone so I had to mix it with quite a lot of "Brunswick
green" in order to make the scratches appear. The entire front have
also received the tan paint splatter. This was applied with an airbrush
and then the heavier areas was "splattered" with paint on a
tooth brush. It gave the exact effect that I was looking for! |
Time for a breather - and a COMPARISON! |
 |
 |
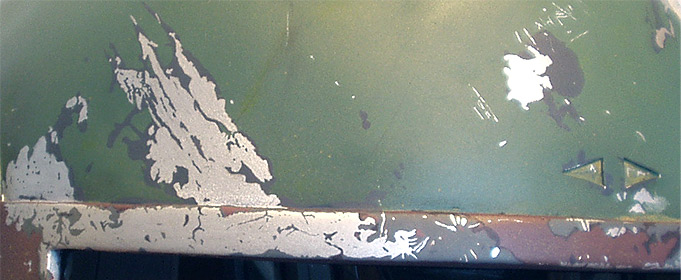
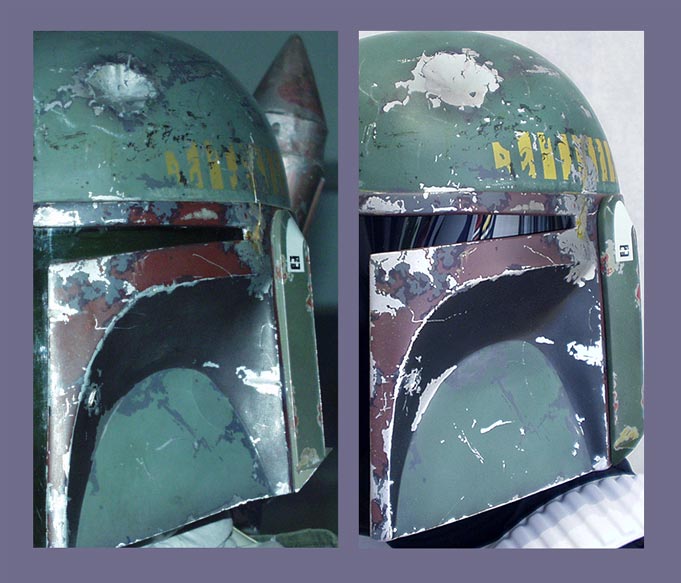
Pic 15 & 16 :Bragging time!
Above is a comparison of the Original Helmet on the left against the
helmet I'm working on (right). The finished cheek area. The only new thing
that's going on here are the tiny black scratches. These were done with
"Citadels Black ink" applied with a needle. |
|
|
|
|
Pic 17: (above). The main scratches have been put on
color by color.
|
|
|
|
Pic 18. (above) And again on the other side.
|
|
|
|
Pic 19. After the "colored" scratches was in
place I continued with the other details like hair fine scratches, scuff
marks and the yellow stains. Most of these details were painted on with
"Citadel inks"
|
|

|
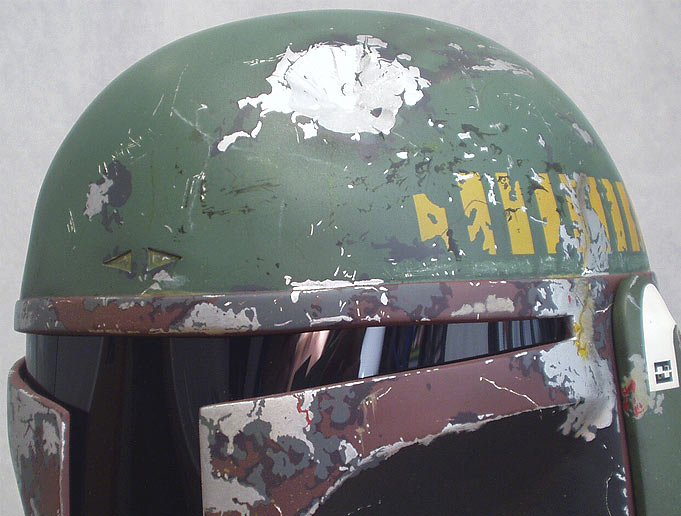
| Pic 20. A closer look of the "kill
stripe" side. This was probably the most time consuming part of the
helmet! Lot's of details here.
We're nearly there - Time for another COMPARISON! |
|
|
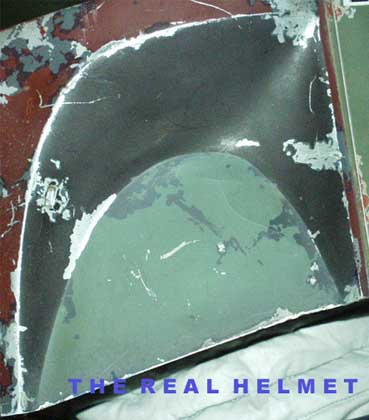
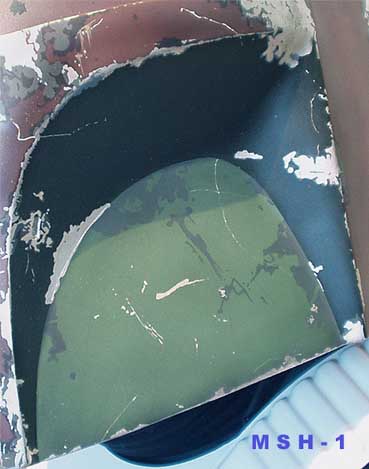
Pic 22. A side by side comparison with the real
helmet. Please note though that I've adjusted the light and exposure in
Photoshop to get a better lighting match, other than that nothings been
tampered with.
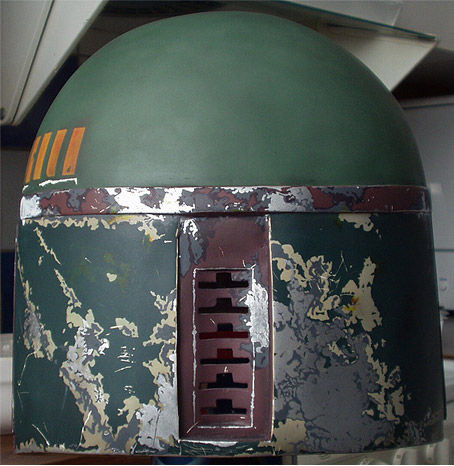
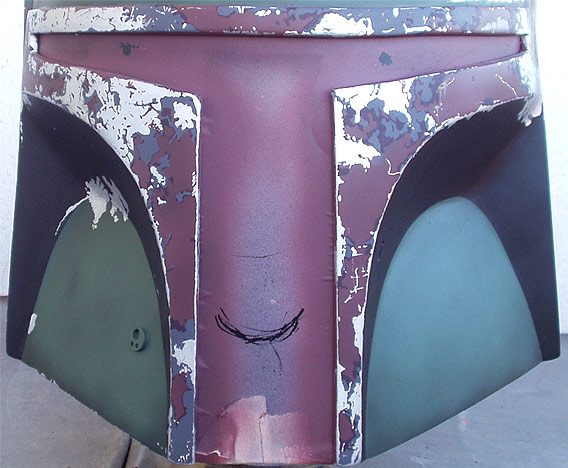
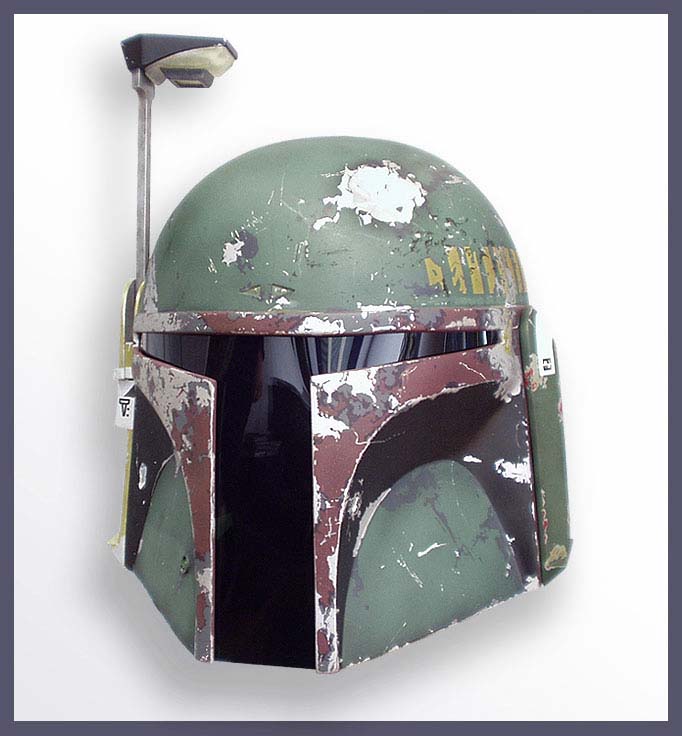
Finally its finished - and here's a shot of the completed helmet |
|
|
Well I guess that's it! I hope you have enjoyed
the tutorial! I sure did...both making the helmet and writing down this
stuff for you! Its now being boxed on its way to its new home who will I'm
sure take lots of new pics.
Until then, THANKS for your interest!
Steve. |
|